

How To Login As Administrator In Windows Server 2003
In a Windows server environment, it is very of import that merely authenticated users are immune to log in for security reasons. To fulfill this requirement the creation of User accounts and Groups is essential.
User Accounts
In Windows Server 2003 computers there are two types of user accounts. These types are local and domain user accounts. The local user accounts are the single user accounts that are locally created on a Windows Server 2003 computer to allow a user to log on to a local reckoner. The local user accounts are stored in Security Accounts Manager (SAM) database locally on the hard disk. The local user accounts allow you to access local resources on a reckoner
On the other hand the domain user accounts are created on domain controllers and are saved in Active Directory. These accounts allow to you access resources anywhere on the network. On a Windows Server 2003 computer, which is a fellow member of a domain, you lot need a local user account to log in locally on the estimator and a domain user account to log in to the domain. Although y'all tin accept a same login and password for both the accounts, they are still entirely different account types.
You lot become a local administrator on your computer automatically because local computer account is created when a server is created. A domain administrator can be local ambassador on all the member computers of the domain considering by default the domain administrators are added to the local administrators grouping of the computers that vest to the domain.
This article discusses most creating local as well as domain user accounts, creating groups then adding members to groups.
Creating a Local User Account
To create a local user account, you demand to:
1. Log on as Administrator, or as a user of local administrator group or Account Operators local group in the domain.
2. Open Administrative Tools in the Control Panel and then click Computer Management, every bit shown in Figure i.
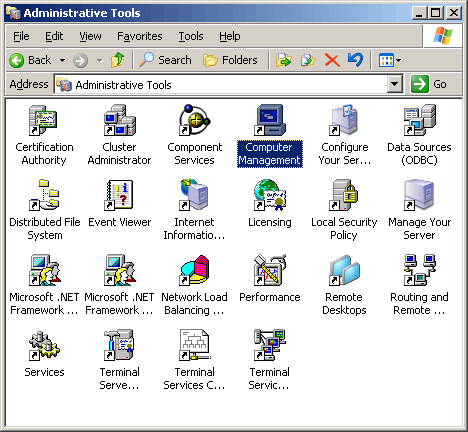
Figure i
3. Click Users folder nether Local Users and Groups node, as shown in Figure 2.
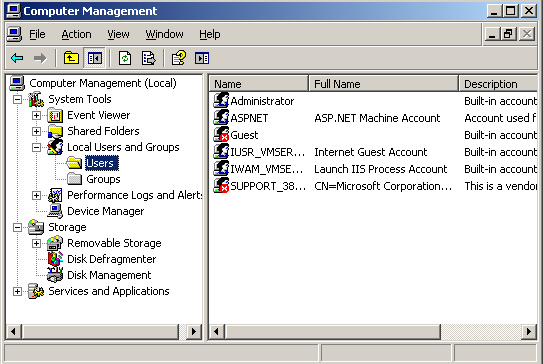
Effigy two
four. Right-click Users then click New User in the menu that appears, as shown in Figure 3:
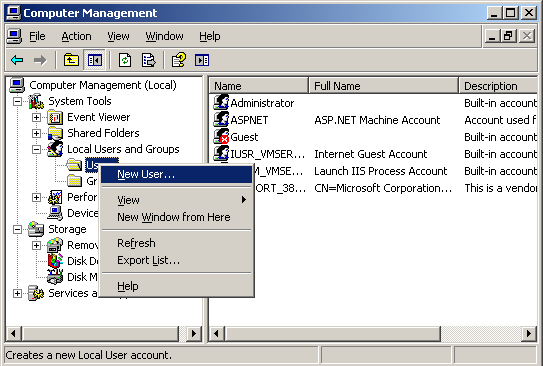
Figure 3
The New User dialog box appears as shown below in Figure 4.
five. Provide the User name and the Password for the user in their respective fields.
half dozen. Select the desired password settings requirement.
Select User must change password at next logon pick if you lot want the user to change the password when the user start logs into computer. Select User cannot modify password option if you lot do not want the user to change the password. Select Countersign never expires option if you do not want the countersign to become obsolete later on a number of days. Select Account is disabled to disable this user account.
7. Click Create , and then click Shut:
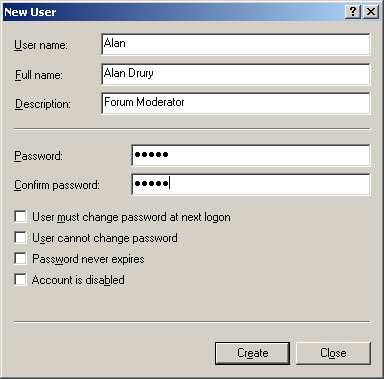
Figure iv
The user business relationship will announced on clicking Users node under Local Users and Groups on the correct panel of the window.
You lot can at present acquaintance the user to a group. To associate the user to a group, you demand to:
8. Click Users folder under Local Users and Groups node.
9. Right-click the user then select Properties from the menu that appears, equally shown in Effigy v:
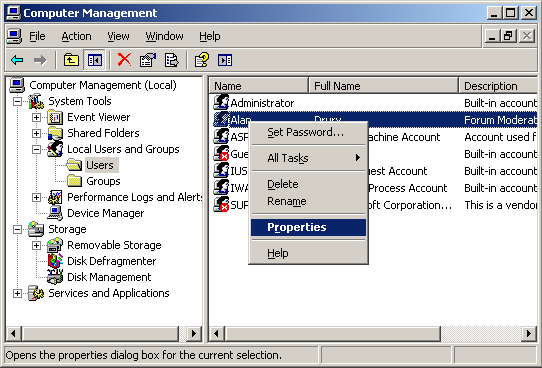
Effigy 5
The Properties dialog box of the user account appears, as shown in Figure 6:
10. Click Fellow member of tab.
The group(s) with which the user is currently associated appears.
11. Click Add.
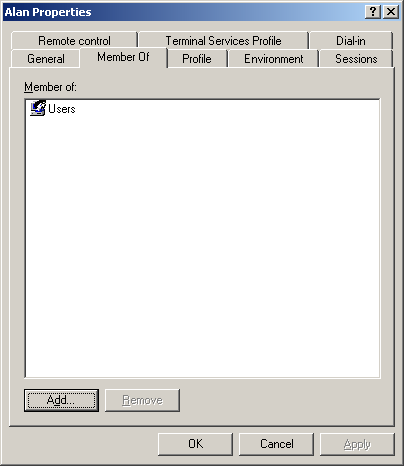
Figure 6
The Select Groups dialog box appears, as shown in Figure 7.
12. Select the name of the group/object that yous want the user to associate with from the Enter the object names to select field.
If the group/object names do non appear, you can click Advanced button to find them. Also if you want to cull different locations from the network or choose cheque the users available, then click Locations or Check Names buttons.
xiii. Click OK .
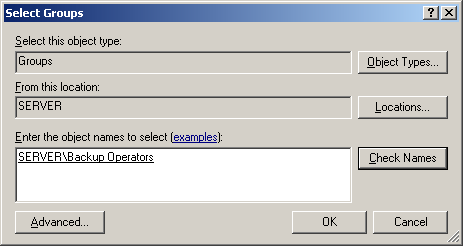
Figure 7
The selected group volition be associated with the user and volition appear in the Backdrop window of the user, equally shown in Effigy 8:
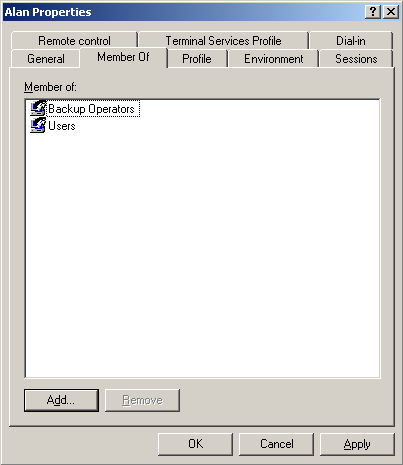
Figure 8
Creating a Domain User Business relationship
The procedure of creating a domain user business relationship is more or less like to the procedure of creating a local user account. The merely difference is a few unlike options in the same type of screens and a few steps more in between.
For example you need Agile Directory Users and Computers MMC (Microsoft Management Console) to create domain account users instead of Local Users and Computers MMC. Also when you create a user in domain then a domain is associated with the user past default. However, you can change the domain if you want.
Besides all this, although, a domain user business relationship can be created in the Users container, it is always ameliorate to create information technology in the desired Organization Unit (OU).
To create a domain user account follow the steps given below:
1. Log on as Administrator and open Active Directory Users and Computers MMC from the Administrative Tools in Command Panel, as shown in Figure 9.
2. Expand the OU in which y'all want to create a user, right-click the OU and select New->User from the menu that appears.
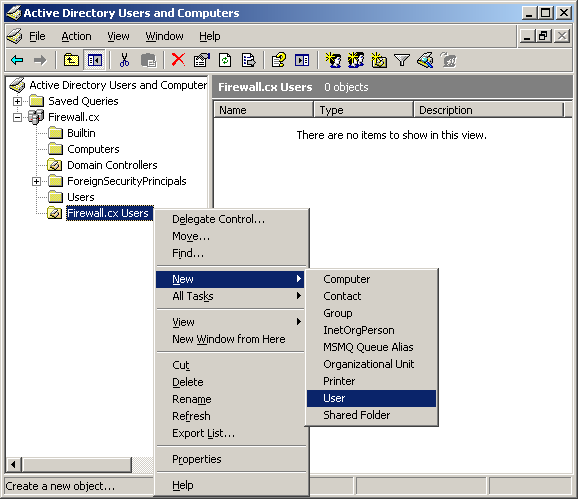
Figure 9
three. Alternatively, you can click on Activeness menu and select New->User from the bill of fare that appears.
The New Object –User dialog box appears, as shown in Figure 10.
4. Provide the First proper name, Last name, and Total proper noun in their respective fields.
v. Provide a unique logon name in User logon name field and then select a domain from the dropdown next to User logon proper name field if you lot desire to change the domain proper name.
The domain and the user name that y'all accept provided will announced in the User logon proper name (pre-Windows 2000) fields to ensure that user is immune to log on to domain computers that are using earlier versions of Windows such as Windows NT.
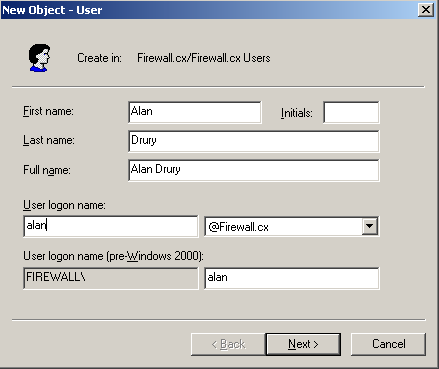
Figure 10
6. Click Next.
The second screen of New Object –User dialog box appears like to Figure 4.
7. Provide the User proper noun and the Password in their respective fields.
8. Select the desired countersign settings requirement:
Select User must modify password at side by side logon option if you want the user to change the password when the user first logs into computer. Select User cannot change password option if you practice not want the user to change the password. Select Password never expires option if y'all exercise not desire the password to become obsolete later on a number of days. Select Account is disabled to disable this user business relationship.
nine. Click Adjacent.
10. Verify the user details that you had provided and click Cease on the tertiary screen of New Object –User dialog box.
11. Follow the steps 9-13 mentioned in Creating a Local User Account department to associate a user to a group.
Creating Groups
Just like user accounts, the groups on a Windows Server 2003 computer are besides of two types, the built in local groups and built in domain groups. The example of sure built in domain groups are: Account Operators, Administrators, Backup Operators, Network Configuration Operators, Functioning Monitor Users, and Users. Similarly certain built in local groups are: Administrators, Users, Guests, and Backup operators.
The built in groups are created automatically when the operating system is installed and go a function of a domain. However, sometimes you lot need to create your own groups to encounter your business requirements. The custom groups let you limit the admission of resources on a network to users as per your business organization requirements. To create custom groups in domain, you need to:
1. Log on as Administrator and open up Active Directory Users and Computers MMC from the Authoritative Tools in Control Panel, as shown in Figure 9.
2. Right-click the OU and select New->Group from the carte du jour that appears.
The New Object –Group dialog box appears, as shown in Figure 10.
3. Provide the name of the group in the Group name field.
The group name that you have provided will appear in the Group name (pre-Windows 2000) field to ensure that grouping is functional on domain computers that are using earlier versions of Windows such as Windows NT.
4. Select the desired group telescopic of the grouping from the Group scope options.
If the Domain Local Scope is selected the members can come up from whatsoever domain only the members tin can access resources just from the local domain.
If Global scope is selected and so members can come merely from local domain but can admission resources in any domain.
If Universal scope is selected and so members can come from whatever domain and members can admission resources from whatever domain.
5. Select the group type from the Group Type options.
The grouping type can be Security or Distribution . The Security groups are but used to assign and proceeds permissions to access resources and Distribution groups are used for no-security related tasks such equally sending emails to all the grouping members.
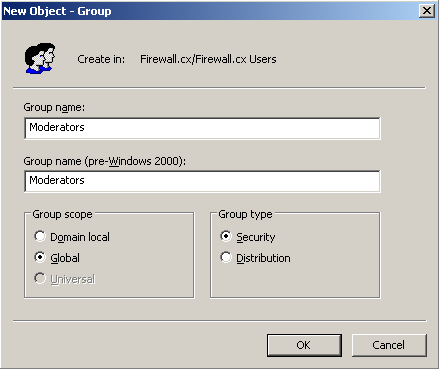
Figure eleven
6. Click OK.
You tin can add members to group just every bit you lot add groups to members. Just right-click the group in Active Directory Users and Computers node in the Active Directory Users and Computers snap-in, select Properties, click Members tab from the Properties window of the group and and so follow the steps from 11-13 from Creating Local User Accounts section.
Article Summary
Dealing with User & Grouping accounts in a Windows Server environment is a very of import everyday task for any Ambassador. This commodity covered bones administration of user and group accounts at both local and domain environments.
If you have constitute the article useful, we would actually appreciate you sharing it with others by using the provided services on the top left corner of this article. Sharing our articles takes just a infinitesimal of your time and helps Firewall.cx attain more people through such services.
Back to Windows 2003 Server Section
Source: https://www.firewall.cx/microsoft-knowledgebase/windows-2003-server/239-windows-2003-users-groups.html
Posted by: watkinshaved1989.blogspot.com
0 Response to "How To Login As Administrator In Windows Server 2003"
Post a Comment